写表单组件部分
一般这个文件写在views或pages文件的login.vue文件中。
一般使用elementplus中的el-form表单标签,可以写上ruler等属性帮助后期验证。
然后再标签中有各个小组件el-form-item构成表单的每一项,在每一项中可以添加prop属性进行命名帮助后期在script标签中使用rules进行验证匹配。
在每一项中再写入想要的输入标签el-input。
简单登录框架
1
2
3
4
5
6
7
8
9
10
| <template>
<div>
<el-form ref="loginRef" :model="loginForm" :rules="rules">
</el-form>
<button @click="handleSubmit">提交</button>
</div>
</template>
|
高级点的
1
2
3
4
5
6
7
8
9
10
11
12
13
14
15
16
17
18
19
20
21
22
23
24
25
26
27
28
29
30
31
32
33
34
35
36
37
38
39
40
41
42
43
44
45
46
47
48
49
50
51
52
53
54
| <template>
<div>
<el-form ref="loginRef" :model="loginForm" :rules="rules">
<el-form-item prop="username">
<el-input
v-model="loginForm.username"
type="text"
size="large"
auto-complete="off"
placeholder="账号"
>
<template #prefix
><svg-icon icon-class="user" class="el-input__icon input-icon"
/></template>
</el-input>
</el-form-item>
<el-form-item prop="password">
<el-input
v-model="loginForm.password"
type="password"
size="large"
auto-complete="off"
placeholder="密码"
@keyup.enter="handleLogin"
show-password
>
<template #prefix
><svg-icon icon-class="password" class="el-input__icon input-icon"
/></template>
</el-input>
</el-form-item>
<el-form-item prop="username">
<el-input
v-model="loginForm.username"
type="text"
size="large"
auto-complete="off"
placeholder="账号"
>
<template #prefix
><svg-icon icon-class="user" class="el-input__icon input-icon"
/></template>
</el-input>
</el-form-item>
</el-form>
<button @click="handleSubmit">提交</button>
</div>
</template>
|
第二步引入api中的接口
在page或者view文件夹中的login.js文件中,引入api中相应的相关文件(一般的地址为api文件夹中的login.js文件中)
引入接口传递数据的方法
1
| import { login } from '~/api/'
|
第三步写Script中的表单对象
在script标签中定义一个接收上面表单的元素
1
2
3
4
| const form = reactive({
username:"",
password:""
})
|
第四步写Script中定义rules的部分
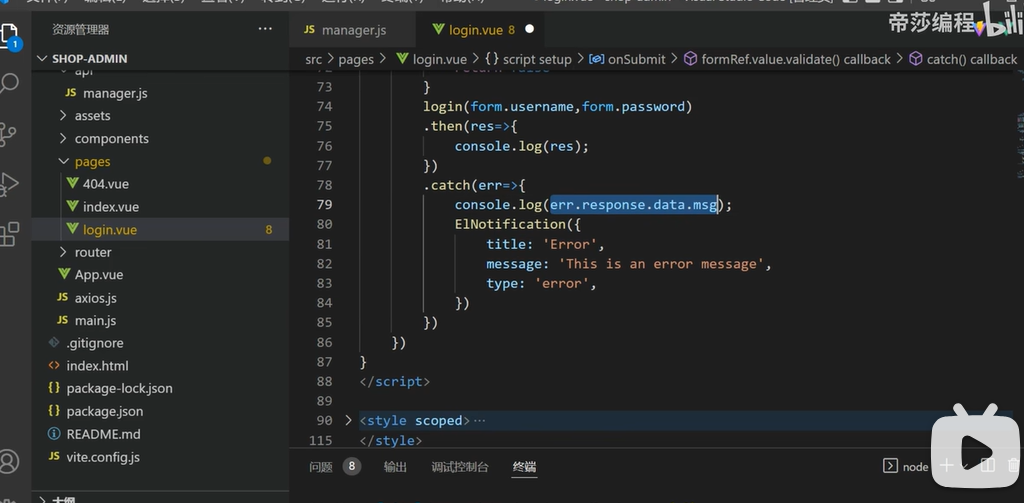
第五步写Script提交登录部分
简单登录框架
1
2
3
4
5
6
7
8
9
10
11
12
13
14
15
16
17
18
19
20
21
22
23
24
25
26
27
28
29
30
31
32
33
34
35
36
37
38
39
40
41
42
43
44
45
| <script>
import { ref } from 'vue'
export default {
setup() {
const loginRef = ref(null)
const loginForm = ref({
username: '',
password: ''
})
const rules = {
}
const handleSubmit = () => {
loginRef.value.validate((valid) => {
if (valid) {
console.log('表单验证通过,提交数据', loginForm.value)
login(loginForm.username,loginForm.password)
.then(res=>{
})
.catch(err=>{
})
} else {
console.log('表单验证失败')
return false
}
})
}
return {
loginRef,
loginForm,
rules,
handleSubmit
}
}
}
</script>
|
高级点的
使用proxy调用数据,进行父传子通信。
使用cookies进行数据保存。
1
2
3
4
5
6
7
8
9
10
11
12
13
14
15
16
17
18
19
20
21
22
23
24
25
26
27
28
29
30
31
32
33
34
35
36
37
| const { proxy } = getCurrentInstance();
function handleLogin() {
proxy.$refs.loginRef.validate((valid) => {
if (valid) {
loading.value = true;
if (loginForm.value.rememberMe) {
Cookies.set("username", loginForm.value.username, { expires: 30 });
Cookies.set("password", encrypt(loginForm.value.password), {
expires: 30,
});
Cookies.set("rememberMe", loginForm.value.rememberMe, { expires: 30 });
} else {
Cookies.remove("username");
Cookies.remove("password");
Cookies.remove("rememberMe");
}
userStore
.login(loginForm.value)
.then(() => {
router.push({ path: redirect.value || "/" });
})
.catch(() => {
loading.value = false;
if (captchaEnabled.value) {
getCode();
}
});
}
});
}
|
注意:使用element—plus引入报错信息
1
2
3
4
5
6
7
8
9
10
11
12
13
14
15
16
17
18
19
20
21
22
23
24
25
26
27
28
29
30
31
32
33
34
35
36
37
38
39
40
41
42
43
| <template>
<el-button plain @click="open1"> Success </el-button>
<el-button plain @click="open2"> Warning </el-button>
<el-button plain @click="open3"> Info </el-button>
<el-button plain @click="open4"> Error </el-button>
</template>
<script lang="ts" setup>
import { ElNotification } from 'element-plus'
const open1 = () => {
ElNotification({
title: 'Success',
message: 'This is a success message',
type: 'success',
})
}
const open2 = () => {
ElNotification({
title: 'Warning',
message: 'This is a warning message',
type: 'warning',
})
}
const open3 = () => {
ElNotification({
title: 'Info',
message: 'This is an info message',
type: 'info',
})
}
const open4 = () => {
ElNotification({
title: 'Error',
message: 'This is an error message',
type: 'error',
})
}
</script>
|
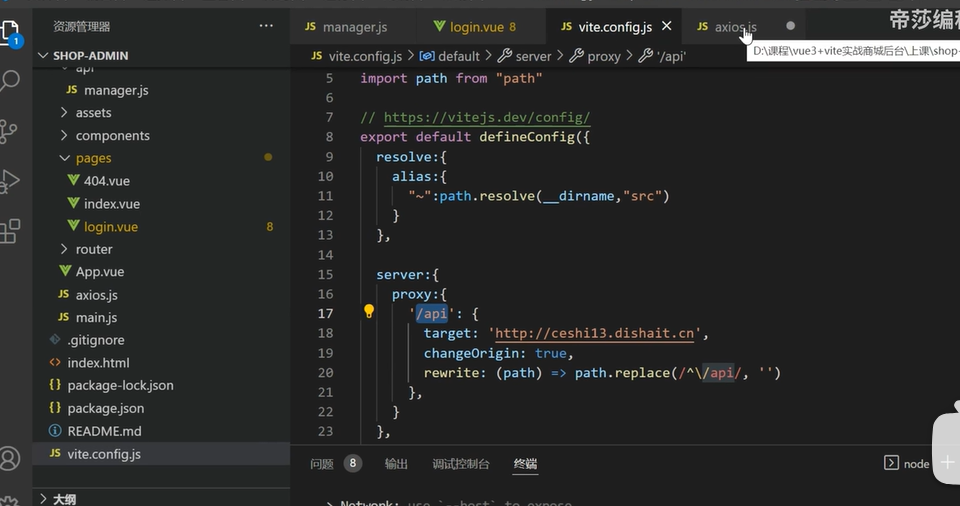
第六步定义代理
有的时候我们会请求失败,在初期过程中,大概概率是代理没有设置好。
在vite.config.js文件中我们可以设置相关的代理。
在vite官方文档里有提及到相关的使用方法。
1
2
3
4
5
6
7
8
9
10
11
12
13
14
15
16
17
18
19
20
21
22
23
24
25
26
27
28
29
30
31
32
33
34
| export default defineConfig({
server: {
proxy: {
'/foo': 'http://localhost:4567',
'/api': {
target: 'http://jsonplaceholder.typicode.com',
changeOrigin: true,
rewrite: (path) => path.replace(/^\/api/, '')
},
'^/fallback/.*': {
target: 'http://jsonplaceholder.typicode.com',
changeOrigin: true,
rewrite: (path) => path.replace(/^\/fallback/, '')
},
'/api': {
target: 'http://jsonplaceholder.typicode.com',
changeOrigin: true,
configure: (proxy, options) => {
}
},
'/socket.io': {
target: 'ws://localhost:3000',
ws: true
}
}
}
})
|
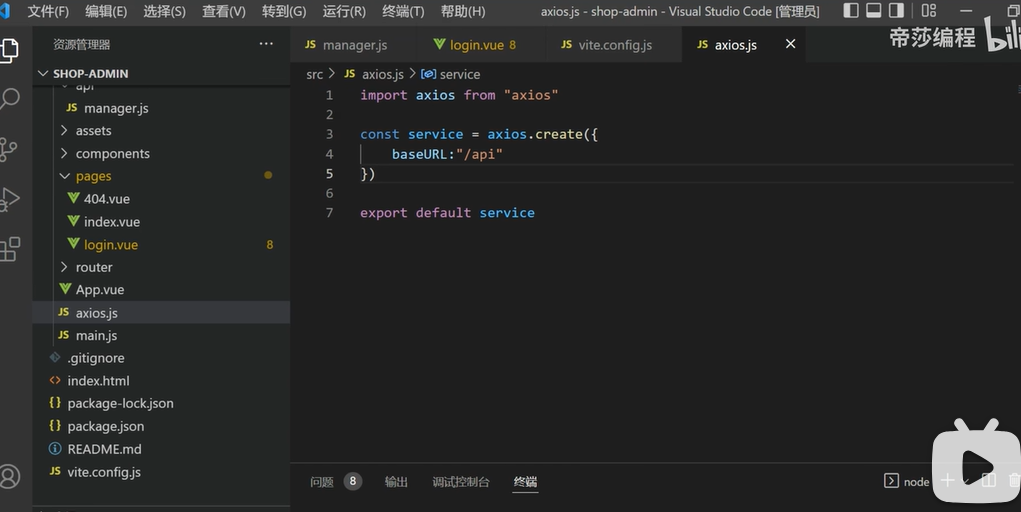
第七步再到更改基本路径
更改request.js中的基本的路径名字,用/api或其他代替